What do you do with an old Swiss Army Knife (Victorinox version) when the cheek gets damaged or you just fancy giving it a face lift?
Some people are not aware that there are two Swiss Army knife manufacturers; one claims to be the "Original Swiss Army Knife" and the other "The Genuine Swiss Army Knife" Victorinox and Wenger.


From the 1890's both supplied the Swiss Army, who in 1908 were very diplomatic in procuring the same amount from each company. The term "Swiss Army knife" was coined by US soldiers after WW2, because is was easier than pronouncing its original name, "Offiziersmesser"
Have a look on Wikipedia for the full history and the history of the two companies (though Victorinox took over Wenger in 2005).
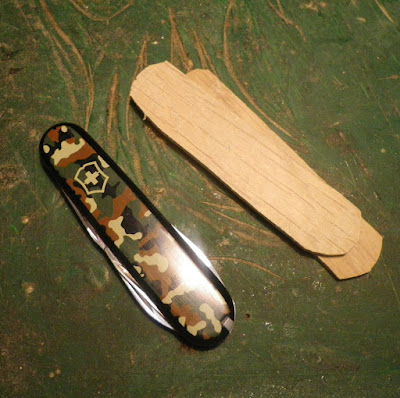
I had a (Victorinox) knife where the plastic cheek buckled for some reason so I needed to either fix it or replace it. I decided to try to replace both cheeks from the standard plastic to natural wood. I loved the finished piece so decided to convert my other knife purely for cosmetic reasons. This post takes you through the face lift of the second knife.
The first Swiss Army Knife (Made in Germany before Wenger and Victorinox) had black oak and then ebony handles; this conversion takes the knife back to its historical ancestors and to an age of craftsmanship.
The knife is a Tinker and cost me £9.99 from ebay (when you could buy knives on ebay)
Here is the Oak I cut on a bandsaw, well seasoned and slightly thicker than the plastic cheeks.
The plastic cheeks are friction fitted using the brass rivets that pivot the blades. This was the ingenious design that made the Swiss Army Knife possible. the original idea was that the Swiss infantryman could open tins of food, take cork from a bottle and completely service his rifle with one knife. this design made a knife that had enough attachments so that this was possible. (Don't forget this was 1893 ish)
The thing to notice is that with the plastic cheeks there are slots for the Toothpick and Tweezers. With the wooden conversion these are left out.
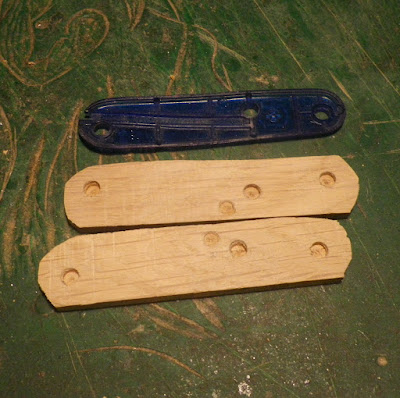
The damaged cheeks from the first knife have been converted into a pattern / jig so that I can drill the rivet holes in the right place for attaching the wood to the knife securely.
The holes drilled are just a fraction too small so that they fit tight over the rivets. the smaller hole is to allow for the back end pivot.
Both done. There is a right hand and a left hand but the cheeks are identical shapes at this stage. As you can see the oak is rough cut but sanded flat on the face sides.
Because wood is a living thing; even when seasoned it moves, expanding and contracting in damp and dry conditions, I decided to glue the oak to the body of the knife. modern glues are fantastic and I opted for superglue. The body of the knife is cleaned with white spirit and sanded to rough up the metal as a key for the glue. I could have used evostick but is smells and has a high VOC rating.
The cheeks are glued and 'Tapped' onto the body using a small hammer, locating the drilled holes with the rivets.
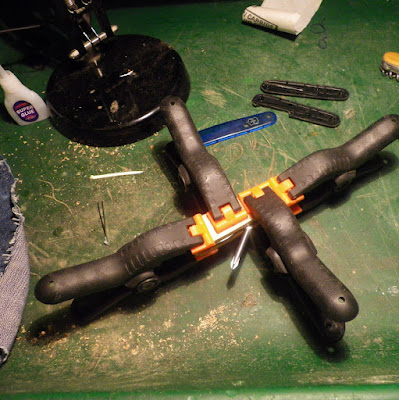
Clamps hold the wooden cheeks on as the glue goes off.
Clamps off the knife is ready for the cheeks to be cleaned back. The screwdriver attachment is sticking out as the wooden cheek needs paring back to allow it to fit properly.
The thickness of the cheeks will allow the knife to be slightly thicker and more rounded. This wont be very noticeable when finished unless placed alongside another Tinker, but gives a slightly more comfortable feel.
The rough edges trimmed back to the knife body. A scalpel sharp craft knife is needed to get this accurate.
The next step is rounding the edges for comfort.
Sanding thoroughly to get a smooth finish. wetting the wood and sanding back improves the final finish.
Coated in Danish oil and finally waxed.
The grain is picked out by using an oil with a dark oak stain.
Finished knife with Oak handle
The end product is quite unique and makes a £10 knife into a more expensive handmade looking quality tool.
I may consider doing this for other peoples knives, at a price naturally.
That's all, comments welcome.


10 comments:
Thanks for this post. Very helpful as there is basically no good information on wooden facias elsewhere.
Sorry, I didn't realize that I was advertising.
Question: Would the craftsman of this project be able to do one for me if I send my Wenger knife and a pair of bookmatched hardwood scales? - SR.
Hi Essarr
The only knives I've done are Victorinox as the cheeks are fairly easy to replicate in wood. If you can let me know the style / type of Wenger your talking about I can look at it's design and let you know if I want to do it. I will charge and will let you know a price if it's something I want to take on :) hope that's ok?
Hi Dave,
The Wenger looks almost the same in size and shape as the Tinker you restored, except that the tools may be different. The dimensions of the each cheek on the Wenger knife is 4 mm thick x 20 mm wide x 85 mm long. There are no slots for toothpick or tweezer.
It's not as old as yours, but I had it since 1971, and has some sentiments attached. I loved your oak-cheeked Tinker the minute I saw it, except, I would like something a bit more exotic and red, like stabilized Amboyna Burl or Cocobolo, if you are able source them . In 1982, I had broken one of the red plastic cheeks it trying to remove it and do exactly what you have done with the Tinker. I had bird's eye maple stocks then. I can send you some photos if you wish. (essarr43@gmail.com). Any reasonable charge will be acceptable, and I am in no rush. Cheers..
Hi Dave,
It is the same as:
http://www.wenger.ch/classic-14-1-014-009-000
But it does not have the pull-out tweezer or toothpick.
Hi Essarr yes the knife looks almost identical. If you want to add exotic wood you will need to source it and send it with the knife in suitable sizes and fully dry!
You say reasonable costs, What's reasonable to you re cost?
Where are you? Are you Uk?
Hi Dave,
Thank you for your response. I live in Chennai, India. I am trying to source some 1" x 1" x (?) aged and kiln dried
cocobolo from a Paul Hinds in the US.
https://mail.google.com/mail/?ui=2&ik=aecae57268&view=att&th=132d564c06d23147&attid=0.1&disp=emb&zw
I don't have the lengths of these pieces. But from the images he has sent it looks longer than what is needed. If I ask him to ship it directly to you, then you may keep the 'left-overs' for another pocket knife project. Cocobolo darkens over time, something I am trying to avoid and keep it as reddish as possible over time. If Paul offers me something else, I will let you know.
Reasonable cost? I am stumped! I just received a fountain pen from the USA (as a gift for someone here) made of Amboyna Burl, hand turned with a 22 step finishing process. This is a wood sold by the gram and there is labour involved. I paid US$ 75 for it, including shipping. Is that anything to go by?
I would very much like you to do my knife only because I have seen your work. How much is reasonable to amount to spend on a $35 knife is the question. Sorry, I am at a loss, and I think you have to name your price.
Hi Essarr
Thanks for your enquiry but I would need to charge about £60 to £70 including postage which is, as you say, a lot for a cheap knife.
It would take me at least 3 hours to do the fitting then an hour polishing, add to that the posting and expenses this is a reasonable quote.
I'm not sure I want the job to be fair. I have thought about it and think it is something you could get done cheaper in India ;)
Thanks again for your kind words and comments.
Regards Dave
Hi Dave,
Thank you for the response. It is not so much the about amount involved, but I respect how you feel about it and hence, I am going to give this a go myself after I get hold of some book-matched scales. If I fail, perhaps I will call upon your services. You have great hands, and all the best with your future carvings. Cheers.
I recommend that you do have a go yourself. Follow the instructions and by all means shout if you get stuck. You can send a photo and I will be happy to advise. Regards Dave
Post a Comment